
Share your event and print the QR code
Guests only upload photos if they see the QR code. Here's the whole flow — from invite link to printed table card.
Six steps to QR codes on the table
It all happens in the Share tab of your event. No design software and no other tools needed.
 Step 1
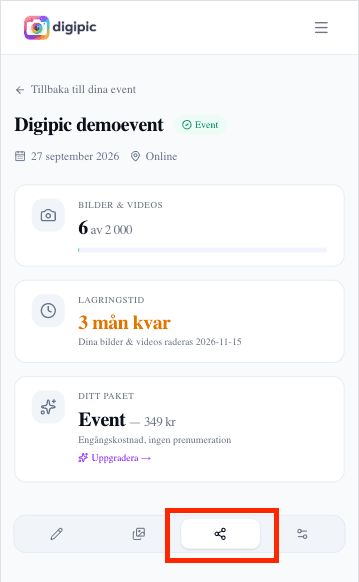
Open the Share tab on your event
Log in, pick your event under My events and go to the Share tab. Everything to do with getting your guests' photos in lives there: the invite link, the QR code, the signs and the slideshow.
- No event yet? Create it first — a name and a date is enough to get going.
- If you're a co-organizer you see the same tab as the person who created the event.
 Step 2
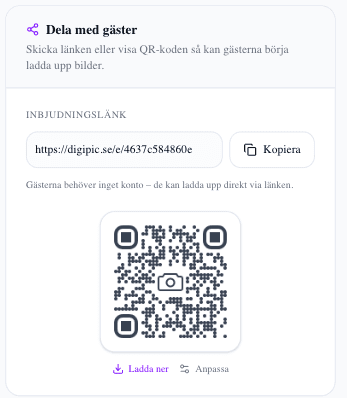
Copy and send the invite link
At the top you'll find the event's invite link, in the form digipic.se/e/ followed by a code. Hit Copy and paste it into the group chat, the invitation, an email or a reminder text the day before. Guests need no account and no app — the link takes them straight to the upload page.
- Send the link ahead of time to anyone who'll be shooting during the prep or on the way there.
- The link stays the same for the whole event, so you can send it as many times as you like.
- Put it in the event's group or on your wedding website too — then late guests can find it themselves.
 Step 3
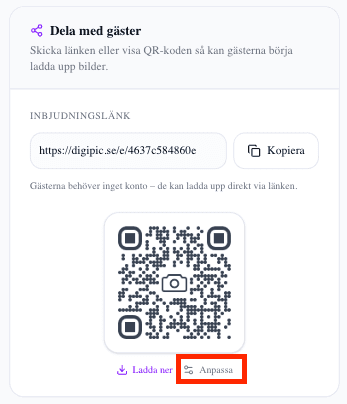
Style the QR code to match the event
Tap Customise next to the QR code. You pick the dot style, the corner style, the foreground and background colours, and you can drop a small icon in the middle — rings, camera, heart, music, sparkles, glasses or cake. The choice is saved on the event, so every download and every sign uses the same style.
- Keep the contrast high. A dark code on a light background scans fastest; a light code on a dark background is far more temperamental.
- The centre icon is a nice touch, but don't make it the main event — the code is there to be read, not admired.
- Always test the styled code with your own phone camera before printing anything.
 Step 4
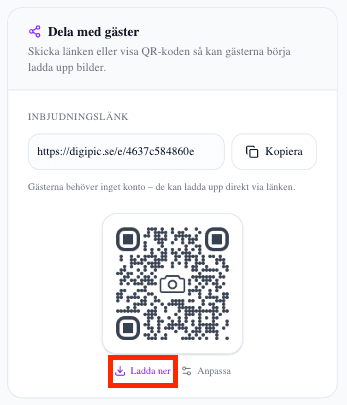
Download the QR code as an image
Download QR code gives you the code as a PNG file, named after your event. Use it when you want the code inside something you're already designing: a printed invitation, a menu, a programme, a presentation or a big screen.
- The image is sized for screens. If you're printing large — a roll-up or an A2 poster — use a ready-made sign from step 5 instead, which is generated at print resolution.
- Always print the link as readable text under the code. It's the fallback for guests with an older phone or a camera that won't cooperate.
 Step 5
Design print-ready signs
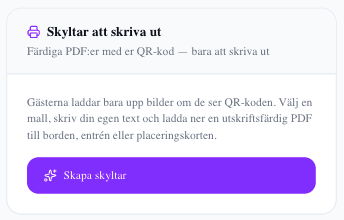
The Printable signs card opens the sign designer. You pick a format and a template, write your own headline and an instruction for your guests, and see the result live in the preview. Download PDF gives you a finished file to send to your printer or print shop.
- Three formats: an A5 table card (one per table), an A4 poster (entrance or bar) and place cards — eight per A4 sheet with dashed cutting guides.
- Four templates: Classic, Bold, Minimal and Rounded. All of them use the QR code and colour you picked in step 3.
- The headline and instruction are yours to write. The default — scan the code and upload, no app and no account needed — works for most events.
- Hit Save choice and the designer remembers your format and template next time you open it.
- On the Grand plan you can hide the Digipic logo in the event settings and put your own logo at the bottom of the sign instead.
- Step 6
Print the signs and put them up
Print the PDF at full size — not scaled — on regular or slightly heavier paper. Then put the signs where guests actually look: at the entrance, on every table, at the bar and by the photo wall. The more places the code appears, the more photos you get.
- Turn off Fit to page or Scale to paper size in the print dialog — otherwise the margins shrink and the code ends up smaller than intended.
- 220–300 gsm paper lets a table card stand up on its own. Thinner paper needs a simple stand or a frame.
- Print one test copy and scan it before running the whole batch.
How many signs do you need — and where do they go?
The most common mistake isn't the wrong colour or the wrong template. It's too few signs, placed where nobody looks. Here's what actually moves the needle on how many photos you get.
Count a couple of signs per zone
Start from how guests move, not from how many there are. A poster at the entrance catches everyone on the way in and is still the single most important sign. One table card per table keeps the code within reach all evening, right where people are sitting with their phones in hand. One at the bar and one by the photo wall covers the two spots where the best photos are actually taken.
For a seated wedding of 80 guests that usually lands on one A4 poster in the entrance, ten table cards and two extras at the bar and photo wall. For a standing reception it's the other way around: more posters on pillars, walls and by the exit, and fewer table cards.
Place cards are for when every guest should have their own — by the place setting, in the welcome bag or handed out at the door. Eight cards per A4 means 80 guests is ten sheets.
Size and distance
A QR code needs roughly a tenth of the reading distance in width. A four-centimetre code reads comfortably at about 40 centimetres — perfect on a table. A code that has to be read from three metres away in an entrance needs to be closer to 30 centimetres wide, which is exactly why the poster format exists.
The sign templates are already proportioned for their format, so the rule that matters is simple: print at full size and don't scale down. An A5 table card printed on A6 halves the code and makes it harder to read in low light.
Paper, light and practical details
Matte paper beats gloss. Gloss reflects candlelight and spotlights straight back into the camera, and then the phone can't find the code. Avoid laminating signs that will sit near candles, too.
Think about the lighting. A candle in front of the sign throws a shadow across the code, and a sign lying flat on the table disappears under plates and glasses before the starter arrives. A sign that stands up, at eye level when seated, gets seen all evening.
Print a few spares. Signs get wet, go missing and end up under someone's jacket — and it's always easier to put up a new one than to explain where the code went.
Show the code on screen as well
If there's a projector, a TV or an LED screen in the room, it's worth using. Turn on the slideshow in the Share tab and the QR code can be shown alongside the photos as they come in, so the code stays on screen while guests watch the result of their own uploads. Seeing your photo appear on the big screen is the best reminder there is to upload more.
The download in step 4 is also perfect for a simple slide between the speeches, or for putting the code in the event programme.
Four mistakes that cost you photos
A code too small for the distance. Table size doesn't work in an entrance.
No readable link under the code. Not every phone scans equally well, and then the written address is the only way in.
No instruction. A bare QR code only gets scanned by cautious guests if they understand what happens next. One line saying the photos go into the hosts' album is enough.
Signs going up once the party has started. Put them up before the first guest arrives — the early photos from the mingle and the prep are often the best ones.
Common questions about sharing and QR codes
What guests and organizers ask most often.
Do guests need to download an app?
No. Guests scan the QR code with the ordinary phone camera, or open the invite link, and upload straight from the browser. No app, no sign-up and no account — that's the whole point of the QR code.
How big should the QR code be?
Count on roughly a tenth of the reading distance. A four-centimetre code is fine on a table, while a code that has to be read from a few metres away in an entrance needs to be around 30 centimetres wide. The sign templates are already sized for their format — just print at full size without scaling.
Can I change the QR code after printing the signs?
You can change the look — dots, corners, colours and the centre icon — as often as you like, and the event's link keeps working exactly as before. New signs get the new style, while the ones already printed keep working, because it's the same link inside the code.
Does the QR code work without internet?
The code itself needs no internet to be scanned, but your guest needs a connection to open the page and upload. If reception is poor at the venue, guest wifi is the single best investment — put the wifi password on the same sign as the QR code.
Can I remove the Digipic logo from the sign?
Yes, on the Grand plan. Turn off Digipic branding in the event settings, upload your own logo, and the signs use your logo instead of the Digipic text along the bottom.
What if a guest can't scan the code?
Have them type the link printed on the sign into their browser instead — that always works. Very old phones may need a QR reader app, but in practice it's usually enough to add light, wipe the lens or hold the phone a few centimetres further away.
Can I share the event without a QR code at all?
Absolutely. The invite link works just as well in a group chat, an email, a text message or on an event page. The QR code is simply the fastest way to share that link when everyone is standing in the same room.
Read on
More on QR codes, sharing and how Digipic works.
Create your event and print your first sign
It takes a few minutes. Your guests need no app and you need no design software.